When you choose metal siding for your home, you’re investing in durability and protection. The installation process involves multiple critical steps—from inspecting your existing structure and removing old materials to installing protective underlayment and precisely cutting panels. Each phase directly impacts how well your siding performs against weather and moisture. Understanding what happens during this transformation helps you prepare, but the details of proper sealing and flashing techniques deserve closer attention.
What Metal Siding Installers Inspect Before Starting
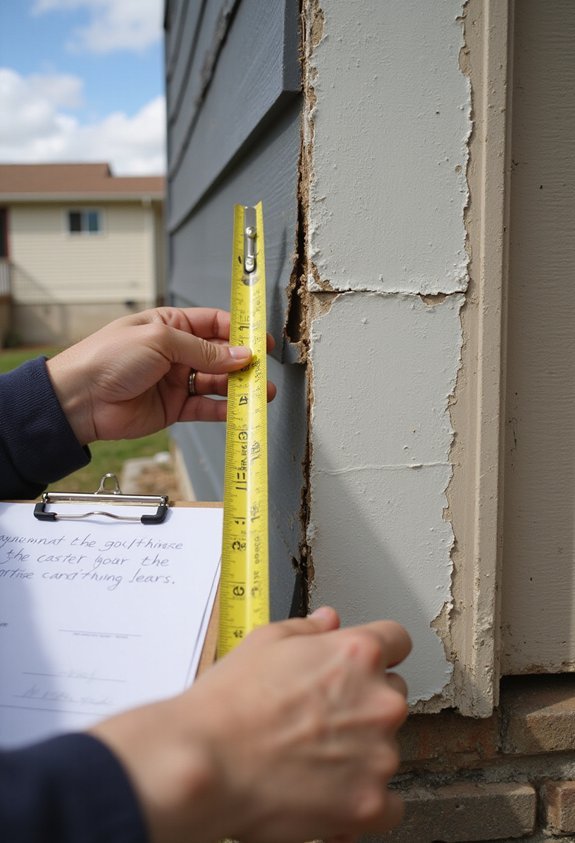
Before metal siding installers begin any installation work, they’ll conduct a thorough inspection of your home’s exterior structure to identify potential problems that could affect the project’s success. They’ll examine the existing siding, sheathing, and framing to detect rot, moisture damage, or structural issues that need repair before installation can proceed. Installers will check your home’s corners, foundation lines, and window frames for proper alignment and damage, as these areas tremendously impact how new panels fit and perform. They’ll also assess your roof eaves, gutters, and drainage systems to verify water won’t collect behind the new siding. Additionally, they’ll identify any electrical outlets, vents, or other obstacles requiring special attention during installation, guaranteeing a smooth, problem-free project completion.
Tearing Off Old Siding and Checking for Damage Underneath
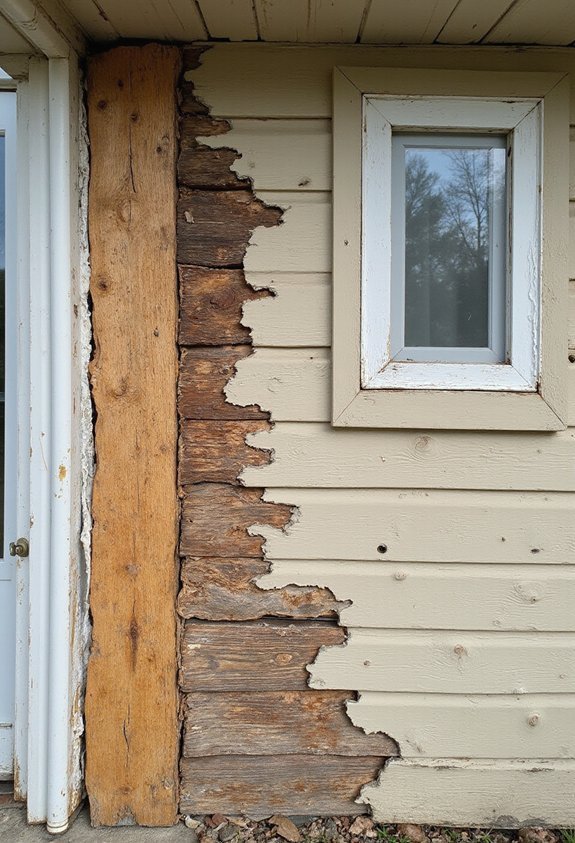
Once the inspection reveals what needs attention, the actual installation process begins with carefully removing the old siding to expose the underlying structure and assess what damage exists beneath the surface. Your installation team’ll use specialized tools to methodically pry away panels without damaging the sheathing underneath. As sections come off, they’ll examine the exposed wood for rot, moisture damage, or structural deterioration that could compromise your new installation. They’ll check for proper sheathing condition and assess whether any repairs are necessary before proceeding. If significant damage is discovered, your installer will inform you of additional work needed and associated costs. This thorough evaluation guarantees your metal siding installation rests on a solid, properly prepared foundation that’ll support it for decades.
Adding the Protective Layer That Keeps Water Out
After your installer’s confirmed that the foundation’s solid and repairs are complete, the next critical step involves installing a moisture barrier that’ll protect your home from water infiltration. Your installer’ll unroll weather-resistant underlayment across the sheathing, securing it with staples or adhesive to create a continuous protective layer. This barrier catches water that may slip behind the metal panels, directing it safely downward and outward through drainage planes. The installer’ll overlap each section by several inches, ensuring no gaps exist where moisture could penetrate. They’ll pay particular attention to corners, windows, and door frames, sealing these vulnerable areas with specialized tape. This meticulous process prevents costly water damage, rot, and mold growth inside your walls, making it essential for your home’s long-term durability and structural integrity.
Measuring and Cutting Panels: Why Precision Matters
With your moisture barrier securely in place, your installer’ll now focus on getting the metal panels themselves ready for installation, which requires careful measurement and accurate cutting to guarantee they fit properly across your home’s walls. Your installer measures each section of your home’s perimeter, accounting for windows, doors, and corners where panels meet. They’ll use these measurements to cut panels to exact lengths, ensuring seamless joints and a professional appearance. Precision during this step prevents gaps that could allow water infiltration and eliminates the need for awkward filler pieces. Accurate cuts also reduce waste material and installation time. Your installer uses specialized cutting tools designed for metal, which provide clean edges and maintain the panel’s structural integrity, setting the foundation for successful installation.
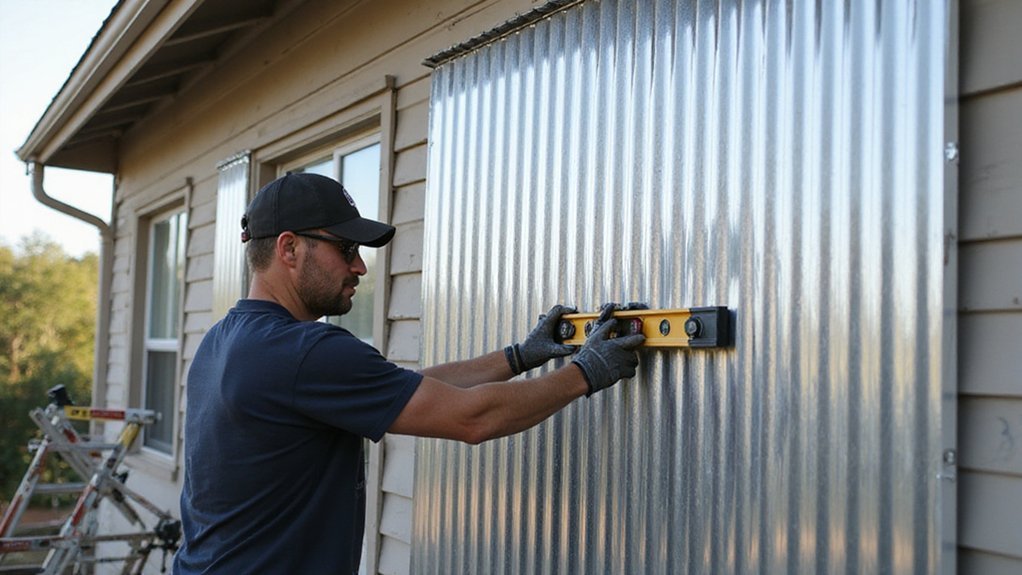
Setting Up Starter Strips and Corner Pieces
Before your installer begins attaching the metal panels to your home’s walls, they’ll first install starter strips and corner pieces, which serve as the foundational guides that keep everything aligned and properly positioned throughout the installation process. Starter strips, which you’ll find along the bottom of your walls, provide a secure anchor point where the first row of panels will lock into place. Corner pieces, installed at the vertical edges where walls meet, guarantee that panels fit snugly without gaps or overlaps. Your installer’ll carefully level these components using professional tools, making certain they’re perfectly straight and secure. This preparation work prevents future problems like misalignment, water infiltration, or visible seams that could compromise your siding’s appearance and protective qualities.
Fastening Metal Panels: Spacing and Techniques That Work
Once your starter strips and corner pieces are secured in place, your installer’ll begin the critical work of fastening the metal panels themselves, which requires precise spacing and proper fastening techniques to guarantee your siding performs as intended. Your installer’ll use corrosion-resistant fasteners, typically galvanized or stainless steel nails or screws, inserting them through the prepunched holes near the top of each panel. Proper spacing between fasteners, typically 16 inches apart, allows panels to expand and contract with temperature changes without buckling. Your installer’ll leave approximately 1/8 inch clearance between panels to accommodate natural movement. They’ll avoid overtightening fasteners, which can restrict expansion and cause damage, instead securing them firmly but allowing slight panel movement for ideal performance.
Sealing Seams and Joints Against Moisture
After your metal panels are fastened securely in place, the installer’ll focus on sealing the seams and joints where panels meet, since these areas are vulnerable points where moisture can penetrate behind your siding and cause damage to the underlying structure. The installer applies a specialized sealant or caulk along each seam, ensuring complete coverage that prevents water from seeping through cracks. They’ll use weatherproof tape or flashing in critical areas like corners and junctions, creating multiple barriers against moisture intrusion. The sealant must cure properly according to manufacturer instructions before exposure to rain or extreme weather. This meticulous sealing process is essential for your siding’s longevity, protecting your home’s interior from water damage, mold growth, and structural deterioration that could result from inadequate sealing.
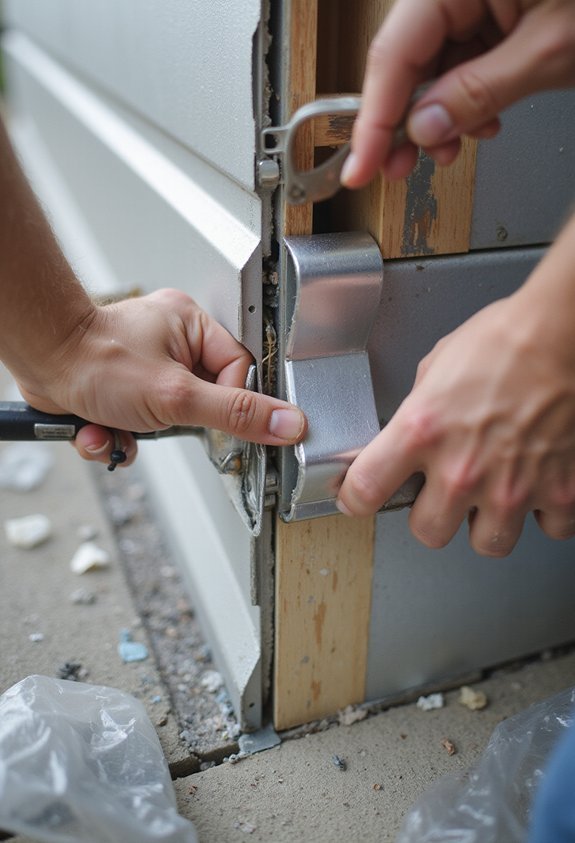
Flashing Around Openings and Trim: Why It’s Critical
While sealing the seams between panels protects against water intrusion along the siding itself, you’ll also need to address the openings where windows, doors, pipes, and other features penetrate through your metal siding, since these areas present even greater vulnerability to moisture damage than standard panel joints. Flashing—thin metal sheets bent to direct water away—must be installed around every opening, overlapping the siding above and extending down over the panels below. You’ll position flashing under the upper trim and over the lower trim, creating a water-shedding pathway. Proper flashing installation prevents water from pooling or running behind your panels, which would cause rust, deterioration, and structural damage. Corners, junctions, and penetrations all require careful flashing placement and secure fastening to maintain your siding’s integrity and longevity.
Timeline and Disruption: What to Expect Each Day
Before you schedule your metal siding installation, it’s helpful to understand how the work’ll unfold day by day so you can plan accordingly and prepare your household for the temporary disruptions that come with this type of project. Day one typically involves site preparation, where crews remove old siding and inspect the underlying structure for damage. Days two through four focus on installing new metal panels, which requires power tools and creates considerable noise. You’ll experience limited access to your home’s exterior during this period. The final day includes trim work, cleanup, and inspection. Most projects take three to five days depending on your home’s size and complexity. Plan for noise, dust, and restricted yard access throughout the installation period.
After Installation: Warranty, Inspections, and Long-Term Care
Once your metal siding installation’s complete, you’ll want to understand the warranty coverage, schedule a professional inspection, and establish a maintenance routine that’ll protect your investment for years to come. Review your warranty documentation thoroughly, noting coverage periods for materials and labor, as well as any conditions that might affect claims. Request a final walkthrough inspection with your contractor to verify proper installation and address any concerns before completion. Establish a seasonal maintenance schedule that includes cleaning debris from panels, inspecting fasteners and seals for corrosion or loosening, and checking caulking around windows and trim. Regular care prevents water intrusion and extends your siding’s lifespan substantially, ensuring your metal panels remain protective and visually appealing throughout their service life.
Conclusion
You’ve now walked through the entire metal siding installation process, which is like building a fortress around your home—each layer and seal working together to protect your structure. By understanding these steps, you’ll recognize quality workmanship and know what inspectors will verify afterward. Your investment in proper installation, combined with routine maintenance and attention to warranty details, guarantees your metal siding performs reliably for decades.